[튜토리얼4] 언어 이해를 위한 트랜스포머(Transformer) 모델
이번 튜토리얼에서는 포르투갈어를 영어로 번역하는 트랜스포머 모델에 대해서 배워보겠습니다.
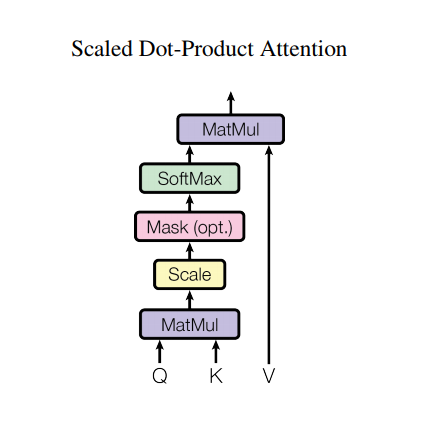
트랜스포머 모델의 핵심 아이디어는 셀프 어텐션(self-attention)입니다. 셀프 어텐션은 입력 시퀀스의 다양한 위치를 고려하여 해당 시퀀스의 표현을 계산할 수 있도록 하는 것입니다. 트랜스포머는 셀프 어텐션 레이어 스택을 생성하며, 이는 스케일링 된 도트 프로덕트 어텐션(Scaled dot product attention)와 멀티 헤드 어텐션(Multi-head attention) 섹션에 설명되어 있습니다.
트랜스포머 모델은 RNN이나 CNN 대신 셀프 어텐션 레이어의 스택을 사용하여 가변적인 크기를 가진 입력값을 처리합니다. 이 일반적인 아키텍처에는 다음과 같은 여러 가지 이점이 있습니다.
- 데이터 전체의 시간적/공간적 관계에 대한 제한이 없습니다. 이는 객체 집합을 처리하는 데 이상적입니다. 예: StarCraft units
- RNN과 같은 직렬 대신 병렬로 레이어 출력값을 계산할 수 있습니다.
- 서로 거리가 먼 항목은 많은 RNN-step이나 컨볼루션 레이어를 통과하지 않고서도 서로의 출력값에 영향을 미칠 수 있습니다.
- 많은 시퀀스 작업에서는 장기적인 의존성 문제가 있지만, 트랜스포머 모델에서는 이러한 장기적인 의존성을 배울 수 있습니다.
이 아키텍처의 단점은:
- 시계열의 경우, 타임 스텝마다의 출력값은 입력 및 최근의 은닉 상태만을 사용해서가 아닌 전체 히스토리를 통해서 계산됩니다. 이는 효율성이 떨어질 수도 있습니다.
- 입력에 텍스트와 같이 시간적/공간적 관계가 있는 경우 일부 공간적 인코딩이 필요합니다. 그렇지 않으면 효과적으로 백 오브 워드(bag of words)를 볼 수 없습니다.
이 튜토리얼의 모델을 학습한 후에는 포르투갈어 문장을 입력하면 영문 번역을 반환할 수 있습니다.

import warnings
warnings.simplefilter('ignore')
import tensorflow_datasets as tfds
import tensorflow as tf

import time
import numpy as np
import matplotlib.pyplot as plt
목차
- 입력 파이프라인 설정하기
- 포지셔널 인코딩
- 마스킹
- 스케일링 된 도트 프로덕트 어텐션
- 멀티 헤드 어텐션
- 신경망으로의 포인트 와이즈 피드
- 인코더와 디코더
- 7.1 인코더 레이어
- 7.2 디코더 레이어
- 7.3 인코더
- 7.4 디코더
- 트랜스포머 생성하기
- 하이퍼파리미터 설정하기
- 옵티마이저
- 손실과 메트릭스
- 학습시키고 체크포인트 만들기
- 평가하기
1. 입력 파이프라인 설정하기
TFDS를 사용해서 TED Talks Open Translation Project의 포르투갈어-영어 번역 데이터셋을 불러오겠습니다.
이 데이터셋은 5만 개에 가까운 학습 데이터와 1100개의 검증 데이터, 2000개의 테스트 데이터를 가지고 있습니다.
examples, metadata = tfds.load('ted_hrlr_translate/pt_to_en', with_info=True,
                               as_supervised=True)
train_examples, val_examples = examples['train'], examples['validation']
학습 데이터셋에서 사용자 정의 서브워드 토크나이저(tokenizer)를 생성합니다.
tokenizer_en = tfds.features.text.SubwordTextEncoder.build_from_corpus(
    (en.numpy() for pt, en in train_examples), target_vocab_size=2**13)

tokenizer_pt = tfds.features.text.SubwordTextEncoder.build_from_corpus(
    (pt.numpy() for pt, en in train_examples), target_vocab_size=2**13)
sample_string = 'Transformer is awesome.'

tokenized_string = tokenizer_en.encode(sample_string)
print ('토큰화된 문자열은 {} 입니다'.format(tokenized_string))

original_string = tokenizer_en.decode(tokenized_string)
print ('원래 문자열: {}'.format(original_string))

assert original_string == sample_string
토크나이저는 단어가 사전에 없는 경우 문자열을 서브워드로 구분하여 인코딩합니다.
for ts in tokenized_string:
    print ('{} ----> {}'.format(ts, tokenizer_en.decode([ts])))
BUFFER_SIZE = 20000
BATCH_SIZE = 64
입력과 타겟에 start와 end 토큰을 삽입합니다.
def encode(lang1, lang2):
    lang1 = [tokenizer_pt.vocab_size] + tokenizer_pt.encode(
      lang1.numpy()) + [tokenizer_pt.vocab_size+1]

    lang2 = [tokenizer_en.vocab_size] + tokenizer_en.encode(
      lang2.numpy()) + [tokenizer_en.vocab_size+1]

    return lang1, lang2
이 함수를 데이터셋의 각 요소에 적용하려면 Dataset.map을 사용합니다. Dataset.map은 그래프 모드에서 실행됩니다.
- 그래프 텐서는 값을 가지지 않습니다.
- 그래프 모드에서는 텐서플로우의 Ops와 함수만을 사용할 수 있습니다.
따라서 이 함수를 직접 .map할 수 없습니다. tf.py_function으로 감싸야 합니다. tf.py_function은 감싼 Python 함수에 일반 텐서를 전달해 이를 통해 값을 사용하고 .numpy() 메서드로 액세스할 수 있도록 해줍니다.
def tf_encode(pt, en):
    result_pt, result_en = tf.py_function(encode, [pt, en], [tf.int64, tf.int64])
    result_pt.set_shape([None])
    result_en.set_shape([None])

    return result_pt, result_en
참고: 이 예시를 작고 비교적 빠르게 유지하기 위해 40개 이상의 토큰을 가진 데이터는 제거합니다.
MAX_LENGTH = 40
def filter_max_length(x, y, max_length=MAX_LENGTH):
    return tf.logical_and(tf.size(x) <= max_length,
                        tf.size(y) <= max_length)
train_dataset = train_examples.map(tf_encode)
train_dataset = train_dataset.filter(filter_max_length)
# 데이터셋을 메모리에 캐싱하여 데이터를 읽는 속도를 높입니다.
train_dataset = train_dataset.cache()
train_dataset = train_dataset.shuffle(BUFFER_SIZE).padded_batch(BATCH_SIZE, ((None,),(None,)))
train_dataset = train_dataset.prefetch(tf.data.experimental.AUTOTUNE)


val_dataset = val_examples.map(tf_encode)
val_dataset = val_dataset.filter(filter_max_length).padded_batch(BATCH_SIZE, ((None,),(None,)))
pt_batch, en_batch = next(iter(val_dataset))
pt_batch, en_batch
2. 포지셔널 인코딩(positional encoding)
이 모델에는 순회(recurrent)나 컨볼루션(convolution)을 포함하고 있지 않기 때문에 문장에서 단어의 상대적 위치에 대한 정보를 모델에 제공하기 위해 포지셔널 인코딩(Positional encoding)이 추가됩니다.
포지셔널 인코딩 벡터가 임베딩 벡터에 추가됩니다. 임베딩은 D-차원의 공간에서 유사한 의미를 가진 토큰을 더 가깝게 나타냅니다. 하지만 그 임베딩은 문장에서 단어의 상대적인 위치는 인코딩하지 않습니다. 그래서 포지셔널 인코딩을 추가하여 단어들은 문장에서 그들의 의미와 위치의 유사성에 기초하여, D-차원 공간에서 더 가까워질 것입니다.
포지셔널 인코딩 계산 공식은 다음과 같습니다:
\(\Large{PE_{(pos, 2i)} = sin(pos / 10000^{2i / d_{model}})}\) \(\Large{PE_{(pos, 2i+1)} = cos(pos / 10000^{2i / d_{model}})}\)
def get_angles(pos, i, d_model):
    angle_rates = 1 / np.power(10000, (2 * (i//2)) / np.float32(d_model))
    return pos * angle_rates
def positional_encoding(position, d_model):
    angle_rads = get_angles(np.arange(position)[:, np.newaxis],
                          np.arange(d_model)[np.newaxis, :],
                          d_model)

    # 배열의 짝수 인덱스에 사인(sin)을 적용합니다: 2i
    angle_rads[:, 0::2] = np.sin(angle_rads[:, 0::2])

    # 배열의 홀수 인덱스에 코사인(cos)을 적용합니다: 2i+1
    angle_rads[:, 1::2] = np.cos(angle_rads[:, 1::2])

    pos_encoding = angle_rads[np.newaxis, ...]

    return tf.cast(pos_encoding, dtype=tf.float32)
pos_encoding = positional_encoding(50, 512)
print (pos_encoding.shape)

plt.pcolormesh(pos_encoding[0], cmap='RdBu')
plt.xlabel('Depth')
plt.xlim((0, 512))
plt.ylabel('Position')
plt.colorbar()
plt.show()
3. 마스킹
시퀀스 배치(batch)의 모든 패드 토큰을 마스킹(masking)합니다. 이렇게 하면 모델이 패딩을 입력으로 취급하지 않습니다. 마스크는 패드 값 0이 있는 위치를 나타냅니다. 해당 위치에서 1을 출력하고, 그렇지 않으면 0을 출력합니다.
def create_padding_mask(seq):
    seq = tf.cast(tf.math.equal(seq, 0), tf.float32)

    # 패딩을 넣기 위해 어텐션 로짓(logit)에 추가적인 차원을 넣습니다.
    return seq[:, tf.newaxis, tf.newaxis, :]  # (batch_size, 1, 1, seq_len)
x = tf.constant([[7, 6, 0, 0, 1], [1, 2, 3, 0, 0], [0, 0, 0, 4, 5]])
create_padding_mask(x)
룩어헤드(look-ahead) 마스크는 향후 토큰을 순차적으로 마스킹하는 데 사용됩니다. 즉, 마스크는 사용할 수 없는 항목을 나타냅니다.
이는 세 번째 단어를 예측하기 위해 첫 번째 단어와 두 번째 단어만 사용된다는 것을 의미합니다. 네 번째 단어를 예측하는 것도 마찬가지로, 첫 번째 단어, 두 번째 단어, 세 번째 단어만 사용됩니다.
def create_look_ahead_mask(size):
    mask = 1 - tf.linalg.band_part(tf.ones((size, size)), -1, 0)
    return mask  # (seq_len, seq_len)
x = tf.random.uniform((1, 3))
temp = create_look_ahead_mask(x.shape[1])
temp
4. 스케일링 된 도트 프로덕트 어텐션(Scaled dot-product attention)

트랜스포머에 사용된 어텐션함수는 세 가지 입력값을 가집니다: Q(쿼리), K(키), V(값) 어텐션 가중치를 계산하는 데 사용된 공식은 다음과 같습니다:
\[\Large{Attention(Q, K, V) = softmax_k(\frac{QK^T}{\sqrt{d_k}}) V}\]도트 프로덕트(dot product)의 어텐션은 깊이(depth)의 제곱근에 의해 조정됩니다. 이것은 도트 프로덕트가 큰 깊이 값을 가지는 경우, 작은 그래디언트를 가진 소프트맥스 함수에 더해져 크기가 매우 커지기 때문에 매우 하드(hard)한 소프트맥스가 만들어집니다.
예를 들어, Q와 K의 평균은 0이고 분산은 1입니다. 행렬 곱셈의 평균은 0이고 분산은 dk입니다. 따라서 Q와 K의 행렬곱은 평균이 0이고 분산이 1이어야 하므로 dk의 제곱근을 스케일링에 사용하고 이를 통해 좀 더 완만한 소프트맥스를 얻게 됩니다.
마스크에 -1e9(음의 무한대에 근접)를 곱합니다. 이는 소프트맥스 직전에 마스크를 스케일링된 Q와 K의 매트릭스에 곱하기 때문에 가능합니다. 목표는 이러한 셀을 0으로 만드는 것이며, 소프트맥스에 큰 음수를 입력하여 출력값을 0에 가깝게 만들어줍니다.
def scaled_dot_product_attention(q, k, v, mask):
    """어텐션 가중치 계산"""

    matmul_qk = tf.matmul(q, k, transpose_b=True)  # (..., seq_len_q, seq_len_k)

    # matmul_qk를 스케일링합니다
    dk = tf.cast(tf.shape(k)[-1], tf.float32)
    scaled_attention_logits = matmul_qk / tf.math.sqrt(dk)

    # 스케일링된 텐서에 마스크를 더합니다.
    if mask is not None:
        scaled_attention_logits += (mask * -1e9)

    # 소프트 맥스의 마지막 축(seq_len_k)을 정규화하여 스코어의 합이 1이 되도록 만듭니다.
    attention_weights = tf.nn.softmax(scaled_attention_logits, axis=-1)  # (..., seq_len_q, seq_len_k)

    output = tf.matmul(attention_weights, v)  # (..., seq_len_q, depth_v)

    return output, attention_weights
소프트맥스 정규화가 K에서 수행되므로 해당 값은 Q에 주어진 중요도를 결정합니다.
출력값은 어텐션 가중치와 V(값) 벡터의 곱셈을 나타냅니다. 이렇게 하면 포커스하고자 하는 단어가 그대로 유지되고 관련 없는 단어가 지워집니다.
def print_out(q, k, v):
    temp_out, temp_attn = scaled_dot_product_attention(
      q, k, v, None)
    print ('어텐션 가중치:')
    print (temp_attn)
    print ('출력 값:')
    print (temp_out)
np.set_printoptions(suppress=True)

temp_k = tf.constant([[10,0,0],
                      [0,10,0],
                      [0,0,10],
                      [0,0,10]], dtype=tf.float32)  # (4, 3)

temp_v = tf.constant([[   1,0],
                      [  10,0],
                      [ 100,5],
                      [1000,6]], dtype=tf.float32)  # (4, 2)

temp_q = tf.constant([[0, 10, 0]], dtype=tf.float32)  # (1, 3)
print_out(temp_q, temp_k, temp_v)
temp_q = tf.constant([[0, 0, 10]], dtype=tf.float32)  # (1, 3)
print_out(temp_q, temp_k, temp_v)
temp_q = tf.constant([[10, 10, 0]], dtype=tf.float32)  # (1, 3)
print_out(temp_q, temp_k, temp_v)
모든 쿼리를 함께 전달합니다.
temp_q = tf.constant([[0, 0, 10], [0, 10, 0], [10, 10, 0]], dtype=tf.float32)  # (3, 3)
print_out(temp_q, temp_k, temp_v)
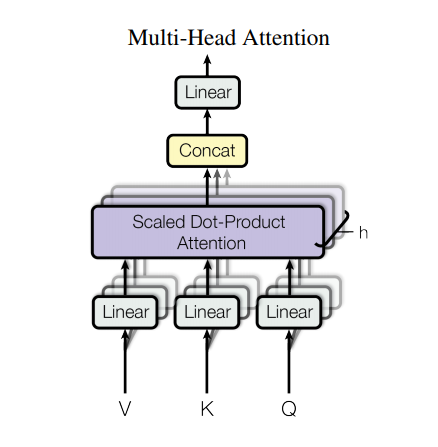
5. 멀티 헤드 어텐션(Multi-head attention)

멀티 헤드 어텐션은 네 부분으로 이루어져 있습니다:
- 헤드들로 나눠진 선형 레이어들
- 스케일링 된 도트 프로덕트 어텐션
- 헤드 합치는 부분
- 마지막 선형 레이어
각 멀티 헤드 어텐션 블록에는 Q(쿼리), K(키), V(값)의 세 가지 입력이 있습니다. 이러한 레이어는 선형(밀도) 레이어를 거쳐 여러 헤드로 분할됩니다.
위에서 정의한 scaled_dot_product_attention은 각 헤드(효율성을 위해 브로드캐스트됨)에 적용됩니다. 어텐션 단계에서는 적절한 마스크를 사용해야 합니다. 그리고 각 헤드의 어텐션 출력값은 tf.transpose와 tf.reshape을 통해 연결되고 최종 Dense 레이어를 통과합니다.
단일 어텐션 헤드를 사용하지 않고 Q, K 및 V는 여러 헤드로 분할됩니다. 이 헤드는 모델이 서로 다른 표현 공간에서 서로 다른 위치로 정보를 공동으로 어텐션할 수 있기 때문입니다. 분할 후 각 헤드의 차원이 감소하므로 전체 계산 비용은 완전한 차원을 가진 단일 헤드 어텐션과 동일합니다.
class MultiHeadAttention(tf.keras.layers.Layer):
    def __init__(self, d_model, num_heads):
        super(MultiHeadAttention, self).__init__()
        self.num_heads = num_heads
        self.d_model = d_model

        assert d_model % self.num_heads == 0

        self.depth = d_model // self.num_heads

        self.wq = tf.keras.layers.Dense(d_model)
        self.wk = tf.keras.layers.Dense(d_model)
        self.wv = tf.keras.layers.Dense(d_model)

        self.dense = tf.keras.layers.Dense(d_model)

    def split_heads(self, x, batch_size):
        x = tf.reshape(x, (batch_size, -1, self.num_heads, self.depth))
        return tf.transpose(x, perm=[0, 2, 1, 3])

    def call(self, v, k, q, mask):
        batch_size = tf.shape(q)[0]

        q = self.wq(q)  # (batch_size, seq_len, d_model)
        k = self.wk(k)  # (batch_size, seq_len, d_model)
        v = self.wv(v)  # (batch_size, seq_len, d_model)

        q = self.split_heads(q, batch_size)  # (batch_size, num_heads, seq_len_q, depth)
        k = self.split_heads(k, batch_size)  # (batch_size, num_heads, seq_len_k, depth)
        v = self.split_heads(v, batch_size)  # (batch_size, num_heads, seq_len_v, depth)

        # scaled_attention.shape == (batch_size, num_heads, seq_len_q, depth)
        # attention_weights.shape == (batch_size, num_heads, seq_len_q, seq_len_k)
        scaled_attention, attention_weights = scaled_dot_product_attention(
            q, k, v, mask)

        scaled_attention = tf.transpose(scaled_attention, perm=[0, 2, 1, 3])  # (batch_size, seq_len_q, num_heads, depth)

        concat_attention = tf.reshape(scaled_attention,
                                      (batch_size, -1, self.d_model))  # (batch_size, seq_len_q, d_model)

        output = self.dense(concat_attention)  # (batch_size, seq_len_q, d_model)

        return output, attention_weights
MultiHeadAttention 레이어를 작성하여 사용해 보겠습니다. 시퀀스의 각 위치 y에서 MultiHeadAttention은 시퀀스의 모든 위치의 어텐션 헤드 8개를 모두 실행하여 각 위치에서 동일한 길이의 벡터를 반환합니다.
temp_mha = MultiHeadAttention(d_model=512, num_heads=8)
y = tf.random.uniform((1, 60, 512))  # (batch_size, encoder_sequence, d_model)
out, attn = temp_mha(y, k=y, q=y, mask=None)
out.shape, attn.shape
6. 신경망으로의 포인트 와이즈 피드(Point wise feed)
신경망으로의 포인트 와이즈 피드는 ReLU 활성화 함수를 사용하는 두 개의 완전히 연결된(fully-connected) 레이어로 이루어져 있습니다.
def point_wise_feed_forward_network(d_model, dff):
    return tf.keras.Sequential([
      tf.keras.layers.Dense(dff, activation='relu'),  # (batch_size, seq_len, dff)
      tf.keras.layers.Dense(d_model)  # (batch_size, seq_len, d_model)
    ])
sample_ffn = point_wise_feed_forward_network(512, 2048)
sample_ffn(tf.random.uniform((64, 50, 512))).shape
7. 인코더와 디코더

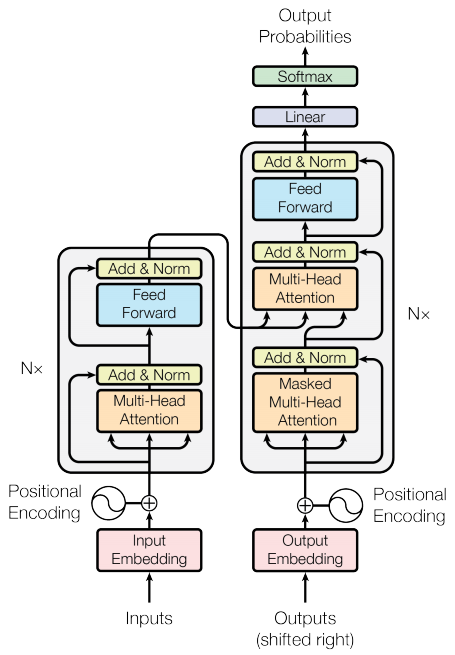
트랜스포머 모델은 어텐션 모델을 가진 표준 스퀀스 투 시퀀스의 일반적인 패턴을 따릅니다.
- 입력 문장은
N인코더 레이어를 통해 전달되며, 이 레이어는 시퀀스의 각 단어/토큰에 대한 출력을 생성합니다. - 디코더는 다음 단어를 예측하기 위해 인코더의 출력과 자체 입력(셀프 어텐션)을 어텐션합니다.
7.1 인코더 레이어
각 인코더는 아래의 서브레이어들로 이루어져 있습니다:
- 패딩 마스크가 있는 멀티 헤드 어텐션
- 신경망으로의 포인트 와이즈 피드
이러한 각 서브레이어에는 해당 서브레이어 주위에 레지듀얼 커넥션(residual connection)이 있고 이어서 레이어 정규화가 있습니다. 레지듀얼 커넥션은 심층 신경망에서 그래디언트 배니싱(gradient vanishing) 문제를 방지하는 데 도움이 됩니다.
각 서브레이어의 출력은 LayerNorm(x + Sublayer(x))입니다. 정규화는 d_model(마지막) 축에서 이루어집니다. 트랜스포머에는 N개의 인코더 레이어가 있습니다.
class EncoderLayer(tf.keras.layers.Layer):
    def __init__(self, d_model, num_heads, dff, rate=0.1):
        super(EncoderLayer, self).__init__()

        self.mha = MultiHeadAttention(d_model, num_heads)
        self.ffn = point_wise_feed_forward_network(d_model, dff)

        self.layernorm1 = tf.keras.layers.LayerNormalization(epsilon=1e-6)
        self.layernorm2 = tf.keras.layers.LayerNormalization(epsilon=1e-6)

        self.dropout1 = tf.keras.layers.Dropout(rate)
        self.dropout2 = tf.keras.layers.Dropout(rate)

    def call(self, x, training, mask):

        attn_output, _ = self.mha(x, x, x, mask)  # (batch_size, input_seq_len, d_model)
        attn_output = self.dropout1(attn_output, training=training)
        out1 = self.layernorm1(x + attn_output)  # (batch_size, input_seq_len, d_model)

        ffn_output = self.ffn(out1)  # (batch_size, input_seq_len, d_model)
        ffn_output = self.dropout2(ffn_output, training=training)
        out2 = self.layernorm2(out1 + ffn_output)  # (batch_size, input_seq_len, d_model)

        return out2
sample_encoder_layer = EncoderLayer(512, 8, 2048)

sample_encoder_layer_output = sample_encoder_layer(
    tf.random.uniform((64, 43, 512)), False, None)

sample_encoder_layer_output.shape  # (batch_size, input_seq_len, d_model)
7.2 디코더 레이어
각 디코더 레이어는 아래의 서브레이어들로 이루어져있습니다:
- 룩어헤드 마스크와 패딩 마스크를 가진 마스킹된 멀티 헤드 어텐션
- 패딩 마스크를 가진 멀티 헤드 어텐션. V(값) 및 K(키)는 인코더 출력값을 입력으로 받습니다. Q(쿼리)는 마스킹된 멀티 헤드 어텐션 서브레이어의 출력값을 받습니다.
- 신경망으로의 포인트 와이즈 피드
이러한 각 서브레이어에는 주위에 레지듀얼 커넥션이 있고 그 뒤에 레이어 정규화가 있습니다. 각 서브레이어의 출력은 LayerNorm(x + Sublayer(x))입니다. 정규화는 d_model(마지막) 축에서 이루어집니다.
트랜스포머에는 N개의 디코더 레이어가 있습니다.
Q는 디코더의 첫 번째 어텐션 블록에서 출력을 받고 K는 인코더 출력을 받으므로 어텐션 가중치는 인코더의 출력을 기반한 디코더의 입력의 중요도를 나타냅니다. 다시 말해, 디코더는 인코더 출력을 보고 자신의 출력값에 셀프 어텐션해서 다음 단어를 예측합니다.
class DecoderLayer(tf.keras.layers.Layer):
    def __init__(self, d_model, num_heads, dff, rate=0.1):
        super(DecoderLayer, self).__init__()

        self.mha1 = MultiHeadAttention(d_model, num_heads)
        self.mha2 = MultiHeadAttention(d_model, num_heads)

        self.ffn = point_wise_feed_forward_network(d_model, dff)

        self.layernorm1 = tf.keras.layers.LayerNormalization(epsilon=1e-6)
        self.layernorm2 = tf.keras.layers.LayerNormalization(epsilon=1e-6)
        self.layernorm3 = tf.keras.layers.LayerNormalization(epsilon=1e-6)

        self.dropout1 = tf.keras.layers.Dropout(rate)
        self.dropout2 = tf.keras.layers.Dropout(rate)
        self.dropout3 = tf.keras.layers.Dropout(rate)


    def call(self, x, enc_output, training,
           look_ahead_mask, padding_mask):
        # enc_output.shape == (batch_size, input_seq_len, d_model)

        attn1, attn_weights_block1 = self.mha1(x, x, x, look_ahead_mask)  # (batch_size, target_seq_len, d_model)
        attn1 = self.dropout1(attn1, training=training)
        out1 = self.layernorm1(attn1 + x)

        attn2, attn_weights_block2 = self.mha2(
            enc_output, enc_output, out1, padding_mask)  # (batch_size, target_seq_len, d_model)
        attn2 = self.dropout2(attn2, training=training)
        out2 = self.layernorm2(attn2 + out1)  # (batch_size, target_seq_len, d_model)

        ffn_output = self.ffn(out2)  # (batch_size, target_seq_len, d_model)
        ffn_output = self.dropout3(ffn_output, training=training)
        out3 = self.layernorm3(ffn_output + out2)  # (batch_size, target_seq_len, d_model)

        return out3, attn_weights_block1, attn_weights_block2
sample_decoder_layer = DecoderLayer(512, 8, 2048)

sample_decoder_layer_output, _, _ = sample_decoder_layer(
    tf.random.uniform((64, 50, 512)), sample_encoder_layer_output,
    False, None, None)

sample_decoder_layer_output.shape  # (batch_size, target_seq_len, d_model)
7.3 인코더
Encoder는 아래와 같이 이루어져있습니다:
- 입력 임베딩
- 포지셔널 인코딩
- N개의 인코더 레이어
입력은 포지셔널 인코딩과 합하는 임베딩을 통해 전달됩니다. 이 합의 출력값은 인코더 레이어의 입력이 되고 인코더의 출력값은 디코더의 입력입니다.
class Encoder(tf.keras.layers.Layer):
    def __init__(self, num_layers, d_model, num_heads, dff, input_vocab_size,
               maximum_position_encoding, rate=0.1):
        super(Encoder, self).__init__()

        self.d_model = d_model
        self.num_layers = num_layers

        self.embedding = tf.keras.layers.Embedding(input_vocab_size, d_model)
        self.pos_encoding = positional_encoding(maximum_position_encoding,
                                                self.d_model)


        self.enc_layers = [EncoderLayer(d_model, num_heads, dff, rate)
                           for _ in range(num_layers)]

        self.dropout = tf.keras.layers.Dropout(rate)

    def call(self, x, training, mask):

        seq_len = tf.shape(x)[1]

        # 임베딩과 포지션 인코딩을 추가합니다.
        x = self.embedding(x)  # (batch_size, input_seq_len, d_model)
        x *= tf.math.sqrt(tf.cast(self.d_model, tf.float32))
        x += self.pos_encoding[:, :seq_len, :]

        x = self.dropout(x, training=training)

        for i in range(self.num_layers):
            x = self.enc_layers[i](x, training, mask)

        return x  # (batch_size, input_seq_len, d_model)
sample_encoder = Encoder(num_layers=2, d_model=512, num_heads=8,
                         dff=2048, input_vocab_size=8500,
                         maximum_position_encoding=10000)
temp_input = tf.random.uniform((64, 62), dtype=tf.int64, minval=0, maxval=200)

sample_encoder_output = sample_encoder(temp_input, training=False, mask=None)

print (sample_encoder_output.shape)  # (batch_size, input_seq_len, d_model)
7.4 디코더
Decoder는 다음과 같이 이루어져 있습니다:
- 출력 임베딩
- 포지셔널 인코딩
- N개의 디코더 레이어
타겟은 포지셔널 인코딩과 합하는 임베딩을 통해 전달됩니다. 이 합의 출력은 디코더 레이어의 입력이 되고 디코더의 출력은 최종 선형 레이어의 입력입니다.
class Decoder(tf.keras.layers.Layer):
    def __init__(self, num_layers, d_model, num_heads, dff, target_vocab_size,
               maximum_position_encoding, rate=0.1):
        super(Decoder, self).__init__()

        self.d_model = d_model
        self.num_layers = num_layers

        self.embedding = tf.keras.layers.Embedding(target_vocab_size, d_model)
        self.pos_encoding = positional_encoding(maximum_position_encoding, d_model)

        self.dec_layers = [DecoderLayer(d_model, num_heads, dff, rate)
                           for _ in range(num_layers)]
        self.dropout = tf.keras.layers.Dropout(rate)

    def call(self, x, enc_output, training,
           look_ahead_mask, padding_mask):

        seq_len = tf.shape(x)[1]
        attention_weights = {}

        x = self.embedding(x)  # (batch_size, target_seq_len, d_model)
        x *= tf.math.sqrt(tf.cast(self.d_model, tf.float32))
        x += self.pos_encoding[:, :seq_len, :]

        x = self.dropout(x, training=training)

        for i in range(self.num_layers):
            x, block1, block2 = self.dec_layers[i](x, enc_output, training,
                                                 look_ahead_mask, padding_mask)

            attention_weights['decoder_layer{}_block1'.format(i+1)] = block1
            attention_weights['decoder_layer{}_block2'.format(i+1)] = block2

        # x.shape == (batch_size, target_seq_len, d_model)
        return x, attention_weights
sample_decoder = Decoder(num_layers=2, d_model=512, num_heads=8,
                         dff=2048, target_vocab_size=8000,
                         maximum_position_encoding=5000)
temp_input = tf.random.uniform((64, 26), dtype=tf.int64, minval=0, maxval=200)

output, attn = sample_decoder(temp_input,
                              enc_output=sample_encoder_output,
                              training=False,
                              look_ahead_mask=None,
                              padding_mask=None)

output.shape, attn['decoder_layer2_block2'].shape
8. 트랜스포머 생성하기
트랜스포머는 인코더, 디코더 및 최종 선형 레이어로 구성됩니다. 디코더의 출력은 선형 레이어에 대한 입력이며 선형 레이어의 출력이 반환됩니다.
class Transformer(tf.keras.Model):
    def __init__(self, num_layers, d_model, num_heads, dff, input_vocab_size,
               target_vocab_size, pe_input, pe_target, rate=0.1):
        super(Transformer, self).__init__()

        self.encoder = Encoder(num_layers, d_model, num_heads, dff,
                               input_vocab_size, pe_input, rate)

        self.decoder = Decoder(num_layers, d_model, num_heads, dff,
                               target_vocab_size, pe_target, rate)

        self.final_layer = tf.keras.layers.Dense(target_vocab_size)

    def call(self, inp, tar, training, enc_padding_mask,
           look_ahead_mask, dec_padding_mask):

        enc_output = self.encoder(inp, training, enc_padding_mask)  # (batch_size, inp_seq_len, d_model)

        # dec_output.shape == (batch_size, tar_seq_len, d_model)
        dec_output, attention_weights = self.decoder(
            tar, enc_output, training, look_ahead_mask, dec_padding_mask)

        final_output = self.final_layer(dec_output)  # (batch_size, tar_seq_len, target_vocab_size)

        return final_output, attention_weights
sample_transformer = Transformer(
    num_layers=2, d_model=512, num_heads=8, dff=2048,
    input_vocab_size=8500, target_vocab_size=8000,
    pe_input=10000, pe_target=6000)

temp_input = tf.random.uniform((64, 38), dtype=tf.int64, minval=0, maxval=200)
temp_target = tf.random.uniform((64, 36), dtype=tf.int64, minval=0, maxval=200)

fn_out, _ = sample_transformer(temp_input, temp_target, training=False,
                               enc_padding_mask=None,
                               look_ahead_mask=None,
                               dec_padding_mask=None)

fn_out.shape  # (batch_size, tar_seq_len, target_vocab_size)
9. 하이퍼파라미터(hyperparameter) 설정하기
작고 비교적 빠르게 유지하기 위해 num_layers, d_model와 dff의 값을 감소시켰습니다.
기본 트랜스포머 모델에 사용된 값은 다음과 같습니다:
- num_layers=6, d_model = 512, dff = 2048
참고: 아래의 값을 변경하면 좋은 모델을 얻을 수 있습니다.
num_layers = 4
d_model = 128
dff = 512
num_heads = 8

input_vocab_size = tokenizer_pt.vocab_size + 2
target_vocab_size = tokenizer_en.vocab_size + 2
dropout_rate = 0.1
10. 옵티마이저(Optimizer)
논문에서 사용한 공식을 이용하여 사용자 정의 학습률(learning rate) 스케줄러를 적용한 아담(Adam) 옵티마이저를 사용하겠습니다.
\[\Large{lrate = d_{model}^{-0.5} * min(step{\_}num^{-0.5}, step{\_}num * warmup{\_}steps^{-1.5})}\]class CustomSchedule(tf.keras.optimizers.schedules.LearningRateSchedule):
def __init__(self, d_model, warmup_steps=4000):
super(CustomSchedule, self).__init__()
self.d_model = d_model
self.d_model = tf.cast(self.d_model, tf.float32)
self.warmup_steps = warmup_steps
def __call__(self, step):
arg1 = tf.math.rsqrt(step)
arg2 = step * (self.warmup_steps ** -1.5)
return tf.math.rsqrt(self.d_model) * tf.math.minimum(arg1, arg2)
learning_rate = CustomSchedule(d_model)

optimizer = tf.keras.optimizers.Adam(learning_rate, beta_1=0.9, beta_2=0.98,
                                     epsilon=1e-9)
temp_learning_rate_schedule = CustomSchedule(d_model)

plt.plot(temp_learning_rate_schedule(tf.range(40000, dtype=tf.float32)))
plt.ylabel("Learning Rate")
plt.xlabel("Train Step")
11. 손실(Loss)과 메트릭스(Mextircs)
타겟 시퀀스가 패딩되었으므로 손실 계산 시 패딩 마스크를 적용하는 것이 중요합니다.
loss_object = tf.keras.losses.SparseCategoricalCrossentropy(
    from_logits=True, reduction='none')
def loss_function(real, pred):
    mask = tf.math.logical_not(tf.math.equal(real, 0))
    loss_ = loss_object(real, pred)

    mask = tf.cast(mask, dtype=loss_.dtype)
    loss_ *= mask

    return tf.reduce_mean(loss_)
train_loss = tf.keras.metrics.Mean(name='train_loss')
train_accuracy = tf.keras.metrics.SparseCategoricalAccuracy(
    name='train_accuracy')
12. 학습시키고 체크포인트 만들기
transformer = Transformer(num_layers, d_model, num_heads, dff,
                          input_vocab_size, target_vocab_size,
                          pe_input=input_vocab_size,
                          pe_target=target_vocab_size,
                          rate=dropout_rate)
def create_masks(inp, tar):
    # 패딩 마스크 인코더
    enc_padding_mask = create_padding_mask(inp)

    # 디코더의 두 번재 어텐션 블록에 사용됩니다.
    # 이 패딩 마스크는 인코더 출력값을 마스킹하기 위해 사용합니다.
    dec_padding_mask = create_padding_mask(inp)

    # 디코더의 첫 번째 어텐션 블록에 사용됩니다.
    # 디코더에서 받은 입력의 향후의 토큰을 패딩하고 마스크하기 위해 사용됩니다.
    look_ahead_mask = create_look_ahead_mask(tf.shape(tar)[1])
    dec_target_padding_mask = create_padding_mask(tar)
    combined_mask = tf.maximum(dec_target_padding_mask, look_ahead_mask)

    return enc_padding_mask, combined_mask, dec_padding_mask
체크포인트 경로와 체크포인트 매니저를 만듭니다. n번의 에포크마다 체크포인트를 저장할 것입니다
checkpoint_path = "./checkpoints/train"

ckpt = tf.train.Checkpoint(transformer=transformer,
                           optimizer=optimizer)

ckpt_manager = tf.train.CheckpointManager(ckpt, checkpoint_path, max_to_keep=5)

# 체크포인트가 있으면 최신 체크포인트를 복원합니다.
if ckpt_manager.latest_checkpoint:
    ckpt.restore(ckpt_manager.latest_checkpoint)
    print ('최신 체크포인트가 복원되었습니다!!')
타겟은 tar_inp와 tar_real로 구분됩니다.
tar_inp은 디코더에 대한 입력으로 전달됩니다.tar_real은 같은 입력을 1씩 이동한 것입니다:tar_input의 각 위치에서tar_real은 예측해야 할 다음 토큰을 가르킵니다.
예를 들면 sentence = “SOS A lion in the jungle is sleeping EOS” 문장이 있을 때 아래와 같이 나뉩니다.
tar_inp = “SOS A lion in the jungle is sleeping”
tar_real = “A lion in the jungle is sleeping EOS”
트랜스포머는 오토 리그레시브(auto-regressive) 모델입니다. 한 번에 한 파트씩 예측하고, 지금까지 나온 출력을 사용하여 다음에 무엇을 해야 할지 결정합니다.
학습하면서 티쳐 포싱을 사용합니다. 티쳐 포싱은 모델이 현재 시간 단계에서 예측하는 것과 무관하게 다음 시간 단계로 실제 출력을 전달하는 것입니다.
트랜스포머가 각 단어를 예측하는 동안 셀프 어텐션을 사용하면 입력 시퀀스에서 이전 단어를 볼 수 있어 다음 단어를 더 잘 예측할 수 있습니다.
모델이 예상 출력에 피크를 찍지 않도록 하기 위해 모델은 룩어헤드 마스크를 사용합니다.
EPOCHS = 2
train_step_signature = [
    tf.TensorSpec(shape=(None, None), dtype=tf.int64),
    tf.TensorSpec(shape=(None, None), dtype=tf.int64),
]

@tf.function(input_signature=train_step_signature)
def train_step(inp, tar):
    tar_inp = tar[:, :-1]
    tar_real = tar[:, 1:]

    enc_padding_mask, combined_mask, dec_padding_mask = create_masks(inp, tar_inp)

    with tf.GradientTape() as tape:
        predictions, _ = transformer(inp, tar_inp,
                                     True,
                                     enc_padding_mask,
                                     combined_mask,
                                     dec_padding_mask)
        loss = loss_function(tar_real, predictions)

    gradients = tape.gradient(loss, transformer.trainable_variables)
    optimizer.apply_gradients(zip(gradients, transformer.trainable_variables))

    train_loss(loss)
    train_accuracy(tar_real, predictions)
포르투갈어는 입력언어로 사용되며 영어는 타겟 언어입니다.
for epoch in range(EPOCHS):
    start = time.time()

    train_loss.reset_states()
    train_accuracy.reset_states()

    # inp -> portuguese, tar -> english
    for (batch, (inp, tar)) in enumerate(train_dataset):
        train_step(inp, tar)

        if batch % 50 == 0:
            print ('에포크 {} 배치 {} 손실 {:.4f} 정확도 {:.4f}'.format(
              epoch + 1, batch, train_loss.result(), train_accuracy.result()))

    if (epoch + 1) % 5 == 0:
        ckpt_save_path = ckpt_manager.save()
        print ('Saving checkpoint for epoch {} at {}'.format(epoch+1,
                                                         ckpt_save_path))

    print ('에포크 {} 손실 {:.4f} 정확도 {:.4f}'.format(epoch + 1,
                                                train_loss.result(),
                                                train_accuracy.result()))

    print ('1 에포크 당 걸린 시간: {} secs\n'.format(time.time() - start))
13. 평가하기
평가는 다음 과정을 따릅니다:
- 포르투갈어 토크나이저(
tokenizer_pt)를 사용하여 입력 문장을 인코딩합니다. 또한 start와 end 토큰을 추가하여 입력 내용이 모델에 학습시킨 토큰과 동일하게 만듭니다. 이것은 인코더 입력입니다. - 디코더 입력은
start token == tokenizer_en.vocab_size입니다. - 패딩 마스크와 룩어헤드 마스크를 계산합니다.
- 그런 다음 디코더는 인코더 출력과 자체 출력(셀프 어텐션)을 보고 예측값을 출력합니다.
- 마지막 단어를 고르고 이것의 argmax를 계산합니다.
- 예측된 단어를 디코더 입력과 함께 디코더에 전달합니다.
- 디코더는 예측한 이전 단어를 기반으로 다음 단어를 예측합니다.
참고: 여기에서 사용하는 모델은 예제를 비교적 빠르게 유지할 수 있도록 용량이 적게 만들었으므로 예측이 정확하지 않을 수 있습니다. 논문의 결과를 재현하려면 위 하이퍼 파라미터를 변경하여 전체 데이터셋과 기본 트랜스포머 모델 또는 트랜스포머 XL을 사용합니다.
def evaluate(inp_sentence):
    start_token = [tokenizer_pt.vocab_size]
    end_token = [tokenizer_pt.vocab_size + 1]

    # 입력 문장은 포르투갈어이므로 start 토큰과 end 토큰을 추가합니다.
    inp_sentence = start_token + tokenizer_pt.encode(inp_sentence) + end_token
    encoder_input = tf.expand_dims(inp_sentence, 0)

    # 타겟은 영어이므로 트랜스포머의 첫번째 단어는 영어 start 토큰입니다.
    decoder_input = [tokenizer_en.vocab_size]
    output = tf.expand_dims(decoder_input, 0)

    for i in range(MAX_LENGTH):
        enc_padding_mask, combined_mask, dec_padding_mask = create_masks(
            encoder_input, output)

        # predictions.shape == (batch_size, seq_len, vocab_size)
        predictions, attention_weights = transformer(encoder_input,
                                                     output,
                                                     False,
                                                     enc_padding_mask,
                                                     combined_mask,
                                                     dec_padding_mask)

        # seq_len 차원에서 마지막 단어를 선택합니다.
        predictions = predictions[: ,-1:, :]  # (batch_size, 1, vocab_size)

        predicted_id = tf.cast(tf.argmax(predictions, axis=-1), tf.int32)

        # predicted_id가 end 토큰과 같으면 결과를 반환합니다.
        if predicted_id == tokenizer_en.vocab_size+1:
            return tf.squeeze(output, axis=0), attention_weights

        # predicted_id를 디코더의 입력값으로 들어가는 출력값과 연결합니다.
        output = tf.concat([output, predicted_id], axis=-1)

    return tf.squeeze(output, axis=0), attention_weights
def plot_attention_weights(attention, sentence, result, layer):
    fig = plt.figure(figsize=(16, 8))

    sentence = tokenizer_pt.encode(sentence)

    attention = tf.squeeze(attention[layer], axis=0)

    for head in range(attention.shape[0]):
        ax = fig.add_subplot(2, 4, head+1)

        # 어텐션 가중치를 그립니다.
        ax.matshow(attention[head][:-1, :], cmap='viridis')

        fontdict = {'fontsize': 10}

        ax.set_xticks(range(len(sentence)+2))
        ax.set_yticks(range(len(result)))

        ax.set_ylim(len(result)-1.5, -0.5)

        ax.set_xticklabels(
            ['<start>']+[tokenizer_pt.decode([i]) for i in sentence]+['<end>'],
            fontdict=fontdict, rotation=90)

        ax.set_yticklabels([tokenizer_en.decode([i]) for i in result
                            if i < tokenizer_en.vocab_size],
                           fontdict=fontdict)

        ax.set_xlabel('Head {}'.format(head+1))

    plt.tight_layout()
    plt.show()
def translate(sentence, plot=''):
    result, attention_weights = evaluate(sentence)

    predicted_sentence = tokenizer_en.decode([i for i in result
                                            if i < tokenizer_en.vocab_size])

    print('Input: {}'.format(sentence))
    print('Predicted translation: {}'.format(predicted_sentence))

    if plot:
        plot_attention_weights(attention_weights, sentence, result, plot)
translate("este é um problema que temos que resolver.")
print ("Real translation: this is a problem we have to solve .")
translate("os meus vizinhos ouviram sobre esta ideia.")
print ("Real translation: and my neighboring homes heard about this idea .")
translate("vou então muito rapidamente partilhar convosco algumas histórias de algumas coisas mágicas que aconteceram.")
print ("Real translation: so i 'll just share with you some stories very quickly of some magical things that have happened .")
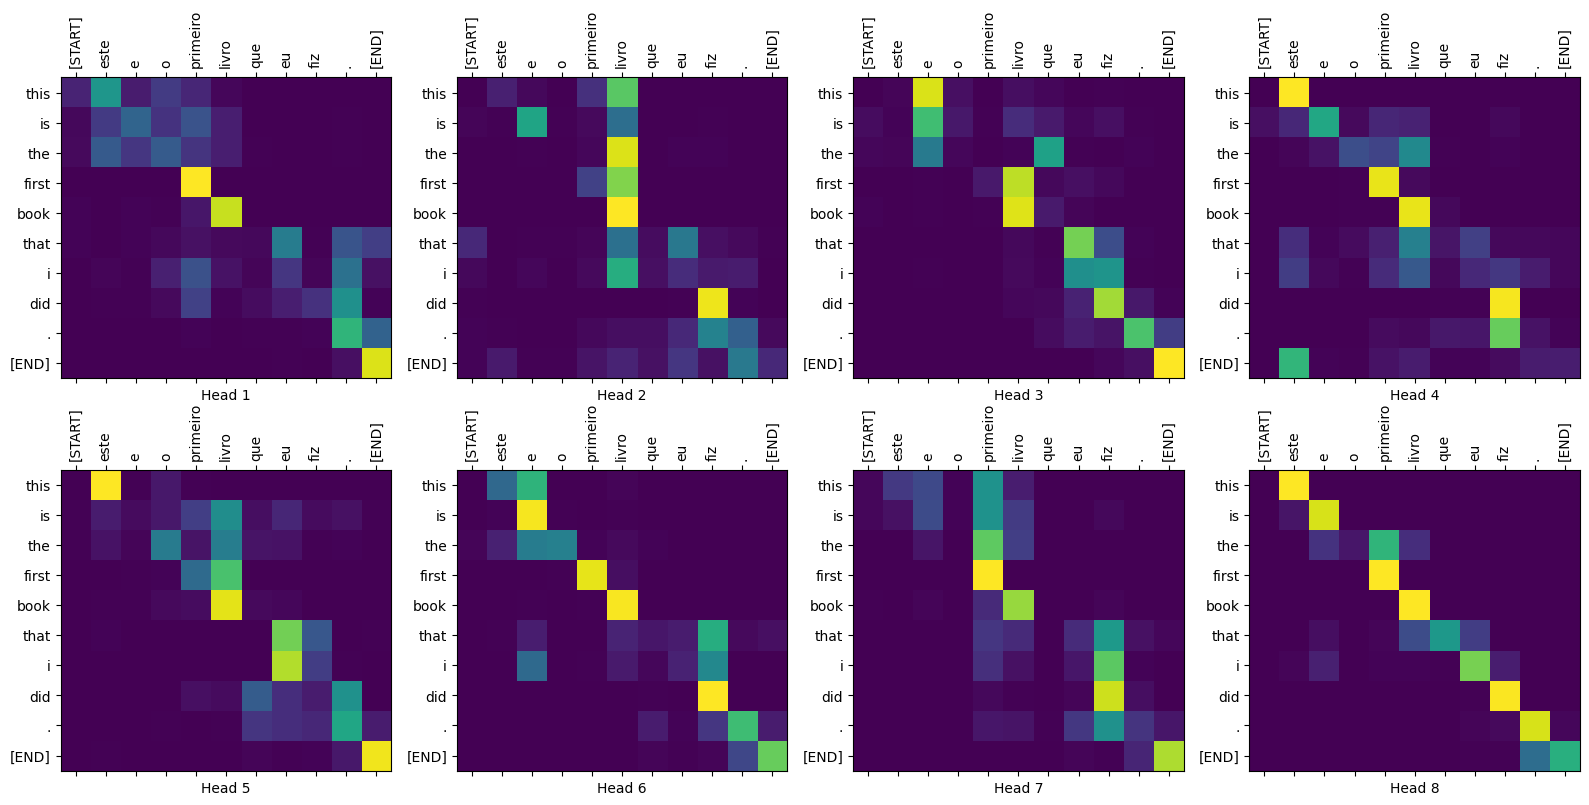
디코더의 여러 레이어와 어텐션 블록을 plot 매개변수로 전달할 수 있습니다.
translate("este é o primeiro livro que eu fiz.", plot='decoder_layer4_block2')
print ("Real translation: this is the first book i've ever done.")
Copyright 2019 The TensorFlow Authors.
#@title Licensed under the Apache License, Version 2.0 (the "License");
# you may not use this file except in compliance with the License.
# You may obtain a copy of the License at
#
# https://www.apache.org/licenses/LICENSE-2.0
#
# Unless required by applicable law or agreed to in writing, software
# distributed under the License is distributed on an "AS IS" BASIS,
# WITHOUT WARRANTIES OR CONDITIONS OF ANY KIND, either express or implied.
# See the License for the specific language governing permissions and
# limitations under the License.